How to schedule social media posts to every platform from one place
A simple, step by step way to plan a week of posts for X, LinkedIn, Instagram, TikTok, YouTube and more in one sitting, then let them publish on time.
7 minute read

Software engineer and SaaS founder
In this article
- What you need before you start
- Step 1: Connect the channels you actually use
- Step 2: Write once, then adjust for each channel
- Step 3: Check the previews before you schedule
- Step 4: Choose when each post goes out
- Step 5: Look at the week on the calendar
- Step 6: See what worked, and use it next week
- A weekly routine you can copy
- Common questions
- Start with one week
Posting on social media is not hard. Posting on several networks, every week, while you also do your actual job, is.
Most people don’t stop posting because they run out of ideas. They stop because the busywork wins: opening five apps, rewriting the same post five ways, and trying to remember what time it is where your audience lives.
Scheduling fixes that. You do the thinking once, in one sitting, and the posts go out on their own. This guide walks through a simple routine you can repeat every week. The examples use PostGic, but the ideas work with any scheduler.
What you need before you start#
- A short list of what you want to say this week. Three to five ideas is plenty.
- Your images and videos in one place. A single folder saves a lot of hunting later.
- The accounts you post to, and access to sign in to each of them.
Step 1: Connect the channels you actually use#
Start by connecting your accounts. PostGic works with nine channels:
| Channel | What you can connect |
|---|---|
| X (Twitter) | X accounts |
| Your LinkedIn profile | |
| Facebook Pages | |
| Professional accounts (Business or Creator) | |
| TikTok | TikTok accounts |
| YouTube | YouTube channels |
| Threads | Threads profiles |
| Bluesky | Your account, connected with an app password |
| Mastodon | Your account, on the server you choose |
Two things trip people up here:
- Instagram only lets scheduling tools publish to professional accounts. If yours is a personal account, you can switch it to a Business or Creator account in the Instagram app. Our guide to scheduling Instagram posts walks through it.
- Facebook lets tools publish to Pages, not to personal profiles.
A tip before you connect everything: start small. Two or three channels you keep up with are worth more than nine you abandon after a month. The Free plan covers up to three channels, so it is a good place to build the habit.
Step 2: Write once, then adjust for each channel#
Open the composer and pick the channels this post should go to. Nothing is selected by default, so a post only goes where you send it.
Write the post in the global editor (the globe icon). Whatever you write there is shared by every channel you picked.
Then make it fit. Click a channel to change the text or media just for that channel. A common pattern:
- a short, punchy version for X, Threads and Bluesky,
- a longer version with more context for LinkedIn,
- a version led by the image or video for Instagram and Facebook.
You can switch back to the shared version anytime if you change your mind.
A few habits make this faster every week:
- Lead with the point. The first line is often all people see, so put the idea first and the context after.
- One idea per post. If you have two ideas, you have two posts.
- Save recurring formats as templates. A weekly tip or a monthly roundup should take minutes, not an hour.
- Keep half-finished ideas as drafts. They are easier to finish later than to start from scratch.
- Tag posts by theme, so you can see at a glance whether your week leans too heavily on one topic.
If you get stuck on wording, the AI Assistant can suggest a rewrite. Treat it as a second pair of eyes: nothing is published until you review it and schedule it yourself. We share a simple workflow in how to use AI to edit your posts.
Step 3: Check the previews before you schedule#
Every network shows posts a little differently. The composer has a live preview for each platform, including playing videos, so you can see what your followers will see.
PostGic also checks each platform’s rules, such as character limits and media limits, before you schedule. If something doesn’t fit, it points to the channel that needs fixing. It is much nicer to fix a post now than to find out later that it never went out.
Two platforms need a little extra attention:
- TikTok. For every video, you choose who can view it (there is no default), turn comments, Duet and Stitch on or off, and disclose promotional or branded content if it applies. Our TikTok scheduling guide covers each setting.
- YouTube. Give the video a clear title and description. After it is published, you can still edit them, and read, reply to and hide comments from PostGic.
Step 4: Choose when each post goes out#
You have four options, and each one suits a different kind of post:
| Option | What it does | Good for |
|---|---|---|
| Post now | Publishes straight away | Timely news and replies to what is happening today |
| Pick a time | Publishes at the exact date and time you choose | Launches, events and anything tied to a moment |
| Add to queue | Fills the next free slot in your posting schedule | Your regular, evergreen posts |
| Add to top of queue | Takes the very next slot, ahead of everything else | Something that should go out soon, without picking a time |
The queue is where scheduling really saves time. Set up your posting schedule once, with the times you want to post on each day. After that, you don’t pick a time for every post. You add it to the queue and it takes the next free slot.
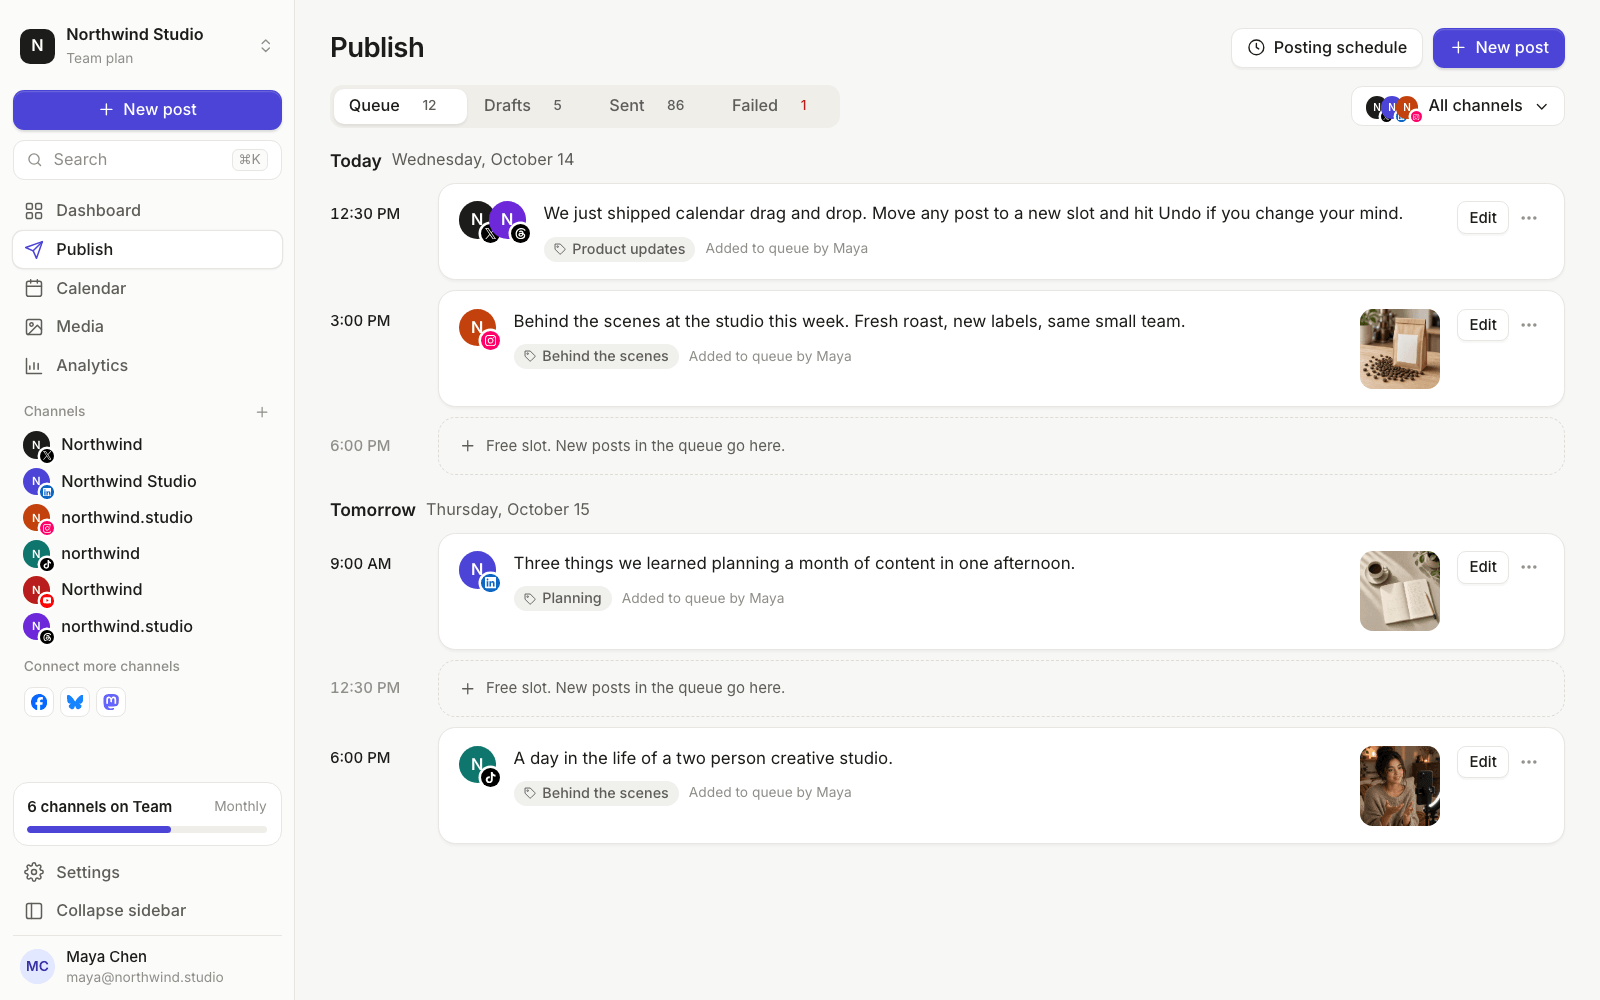
All times are shown in your workspace timezone, so a post set for 9:00 goes out at 9:00 for your audience, wherever you happen to be that week.
Step 5: Look at the week on the calendar#
Once your posts are in, open the calendar. Day, Week and Month views show all 24 hours, so you can spot two posts landing on top of each other, or a quiet stretch with nothing at all.
To move a post, drag it to a new time. If you drop it in the wrong place, use Undo.
Step 6: See what worked, and use it next week#
At the end of the week, open Analytics. Pick a channel, or all channels, and a date range. You will see followers, impressions, engagements, engagement rate and posts published, each compared with the previous period, plus your top posts.
The most useful question to ask is simple: which posts did better than usual, and why? Was it the topic, the format, the first line, the video? Write that down and do more of it next week. If you want to tune when you post as well, try the two-week test in how to find your best time to post.
Analytics are available where a platform’s API provides metrics. They are not available for LinkedIn, so use LinkedIn’s own post analytics there (more in our LinkedIn scheduling guide).
If a post ever fails to publish, it moves to the Failed list with a plain reason, such as an expired connection, and a Retry button.
A weekly routine you can copy#
Here is the whole thing as a routine. It fits into a single sitting, and pairs well with a simple content calendar:
- Look back. Check last week’s top posts and note what to repeat.
- Write. Draft this week’s posts in the global editor.
- Adjust. Customize each channel’s version and check the previews.
- Schedule. Add evergreen posts to the queue, and pick exact times for anything tied to a date.
- Review. Glance at the calendar for gaps or clashes, and drag posts around if needed.
Do this every week and your accounts stay active, even in the weeks when you are busy with everything else.
Common questions#
How far ahead should I schedule?#
A week is a good place to start. It is far enough ahead to take the pressure off, and close enough that your posts still feel current. Once the habit sticks, some people plan a month at a time.
Can I post to X on the Free plan?#
Yes. On the Free plan, X posts can’t contain links. Paid plans remove that limit, and X channels carry an extra charge because X charges per API request. See pricing for the details.
Can my team help with this?#
Yes. Everything lives in a workspace, and on the Team plan you can invite as many teammates as you need. One person can write, another can review, and everyone sees the same calendar.
Start with one week#
You don’t need a content strategy deck to get going. Pick two or three channels, write five posts, and put them in the queue. Next week, look at what worked and do it again.
PostGic has a free forever plan, and you don’t need a credit card to start. Get started for free.
 Anuj Shashimal